Sunday, December 9, 2012

Happy Hollydays

Last year my Mom and I made "funky trees", and for this year's holiday season I made a 12"x12" decorative piece to go with the metalwork display that I introduced in the Welcome Fall blog. Again, I used a pattern from Amber Fenton Designs:


We have two full bins of miscellaneous holiday fabrics in "the stash", so I drew my choices from that. I used the blanket stitch for some of the red and green leaf applique. But, because this is a very small piece just for displaying, I didn't think it really needed a lot of quilting or securing of the raw-edge applique pieces. I also experimented with some free-motion quilting -- and unfortunately was not very happy with either the experience or the results. I have a number of other applique quilts that are nearing completion ... and I'm starting to think that I'm just going to have to save them until there's a long-arm quilting machine in my life!

12"x12" decorative holiday quilt


Decorative holiday quilt in metalwork display.


Happy Hollydays!!

Saturday, November 24, 2012

Mumbo Gumbo

In 2004 we went to Disneyland for my 35th birthday, and while in the Los Angeles area in January we also attended the Road To California Quilt Show -- where I bought one of my first quilt patterns, called Mumbo Gumbo from Pie In The Sky Quilts. It's another project that's perfect for using fabric scraps. Since I've recently been rather obsessed with trying to "put a dent in" our scrap baskets (introduced in 'Got Scraps?'), I finally started -- and finished(!) -- this pattern.

Mumbo Gumbo quilt top
My version is slightly different from the pattern, in that each "log" is of a different fabric -- this allowed for strip piecing, which was much speedier. I had started out matching logs (see the set of two blocks framing the center), but the remainder of the quilt is from randomly selected fabrics. I remember many of these fabrics from previous projects, all the way back to when my Mom was sewing during my childhood. So, this quilt is also kind of a memory quilt.

And no, our scrap baskets are still not empty! In fact, they're as full as ever, sigh. I need to keep a Mumbo Gumbo project continuously going!

Update, June 2013: I decided to get the Mumbo Gumbo quilt finished -- so I chose a marbled yellow wide backing fabric and sent it to B&B Machine Quilting in Oroville, CA for just a simple all-over large stipple. It came out great (the quilting doesn't detract from the pieced design, which is what I wanted), and I decided to just fold over the backing with a machine zig-zag stitch for the binding (very quick!).

Mumbo Gumbo quilt finished! June 2013.


Sunday, November 18, 2012

The Eyes Have It

Last month, my Mom and I enjoyed two very full and fun days at the Pacific International Quilt Show in Santa Clara, CA: One day for viewing all of the show quilts, and a second day for shopping the 300 vendors. Of course before the shopping day, we had surveyed our massive collection of un-finished objects (UFOs) and promised ourselves that we wouldn't buy any new projects. Well, you know that promise is a difficult one to keep, especially when you find something that's "just TOooOO CuuuUUUuute!!! That was the case with the "Eleven Owls and One Moon" small wallhanging quilt by Morning Glory Productions at the Quiltin' Cousins booth; it was love at first sight! The sample -- of small 3" blocks of winking and peeking owls in 1930s fabrics -- reminded me of my Aerie Parrot (he often peeks out at me from behind his toys).

My Mom bought the pre-cut iron-ons for me, which are of 1930s fabrics, and I then used scraps of polka-dot fabrics for the background and miscellaneous 1930s fabrics for the sashing and prairie points. The finished wallhanging is about 12.5"x16.5". This was the first time I'd done prairie points or any hand embroidery (the eyelashes), so the small scale of the project was ideal.

Here's a pic of the wallhanging before adding the eyes:


And, here's a pic of the wallhanging after adding the eyes:


I think the eyes have it!!

Saturday, October 20, 2012

Welcome Fall

I took a hiatus from quilting over the summer, but have started working on a few projects again.

After a brief "last hurrah" heat wave in the Bay Area last week, the season is beginning to turn now --with the music of fog horns along the river in the mornings, and even a few occasional raindrops. To welcome Fall, I just made this small (12"x12") quilt to go with a cute little tabletop metalwork display that my Mom got me recently. It features a little crow button (perched on the upper left ribbon) and several (glue-on) Swarovsky crystals in the middle of the sunflower. I used Lite Steam-A-Seam double stick fusible web for the applique, and quilted a small blanket stitch around the flower petals and stem (using rayon embroidery thread) plus straight stitch-in-the-ditch around the inner border. All of the materials came from my Mom's stash. This was a perfect instant-gratification project: I started and finished it in the same day. And, it was also good (relatively low investment) practice for trying out some machine applique.

A happy sunflower, with crow friend, to welcome Fall.
I used a pattern from Amber Fenton Designs, which my Mom got with the metalwork stand:

She also got a few other small 12"x12" patterns, and I'm planning to make a little quilt to hang on this stand for each of the seasons.

Saturday, June 16, 2012

Quilting Heats Up At The Winters Outdoor Show

My friend Bonnie deserves a medal for venturing out with me today to Winters, CA -- on one of the hottest days of the summer -- for their annual outdoor quilt show. The forecast was for 106F, and the day was indeed a roaster!
Winters, CA
It was a bit of a bummer that the usual crowds to this show were deterred by the heat this year. However, there were many inspiring quilts:


Bonnie said this quilt is "toothy". ;)


Bonnie's favorite; Love the swirl in this Texas Lonestar.
As usual, going to a quilt show has made me just want to get home and do some quilting!!

Tuesday, June 5, 2012

Got Scraps? - Part II

Let the scraps fly! That's what I decided for finishing the scrappy star quilt, making over 200 flying geese units for the borders. I used the squares-on-squares piecing technique for constructing the flying geese from our scrap supply: 2.5"x2.5" squares sewn onto both sides of the dark center 4.5"x2.5" rectangle. However, I would not recommend this approach -- many of the geese ended up wonky. Next time, I will use slightly larger little squares, and then trim the geese units after piecing. So, it was definitely a learning experience!
Chain piecing flying geese.
However, I was still able to schmooze my less-than-perfect geese together to utilize a majority of them for the borders. But because of the inaccuracies, getting a whole number of geese to fit each side of the quilt was problematic. So, I decided to "cheat" and use an asymmetrical border design with the geese, which would conveniently skirt this issue. I'm quite happy with the "finished-is-better-than-perfect" results:
Scrappy Stars finished top.
I lost a few geese points, but this quilt is so scrappy that I think these little boo-boos get somewhat camouflaged in all of the busyness.

There's a little bit of whimsy in the quilt: there is one fabric that appears only once!

This top has been added to the collection destined for eventual long-arm quilting service.

Monday, June 4, 2012

Wine Country Quilts Show

One of the great benefits of being a quilter in the San Francisco Bay Area is that on many weekends there's a quilt show within day-trip distance. So for my parents, going to the many quilt shows has been a hobby in itself. And, now that I've returned to my home state of California, I'm also enjoying the frequent trips to see these wonderful shows.

This past weekend we went to the Wine Country Quilts Show, presented by the Moonlight Quilters of Sonoma County, in Santa Rosa, CA. The featured quilter was Barbara Confer, whose art quilts are composed of raw-edge applique, toile, thread painting, and embellishments. I'd love to try these techniques myself sometime, since I like the realistic look that can be achieved.

Quilt by Barbara Confer.
Quilt by Barbara Confer. This was my favorite; the brown dog reminds us of Ginger!
Close-up of "Ginger" in quilt by Barbara Confer.
Quilt series by Barbara Confer.
I can never pick favorites at the quilt shows, but here are a few of the quilts at this show that I especially liked:


Saturday, May 26, 2012

Got Scraps?

Got scraps? Oh man, we sure do. We have two big baskets, filled to the brim. Having the baskets next to the cutting table is really handy because you can easily toss scrap pieces into them as you work.

Too many scraps.
However, the baskets cease to be handy once they're overflowing! We've been in denial for quite some time now, trying to shove more and more scraps into the baskets. Incredibly, we've also been guilty of collecting scrap pieces from other folks as well! But finally, it has become time to do something with our bounty of left overs and castaways -- So began my recent obsession with making use of scrap fabric. That, and a certain frugality recently imposed by my current state of transition between professional student and the gainfully employed!

Digging through the baskets is not unlike an archeological dig: there are layers of fabric roughly stratified by age, with the oldest remnants toward the bottom. Some of the pieces even date back to my childhood; Now that's vintage stuff! ;) And of course there's fabric from nearly every quilt project that my Mom and I have done over the last decade or so. So, it's fun to take a stroll down memory lane of projects past, by rummaging through our scrap collection.

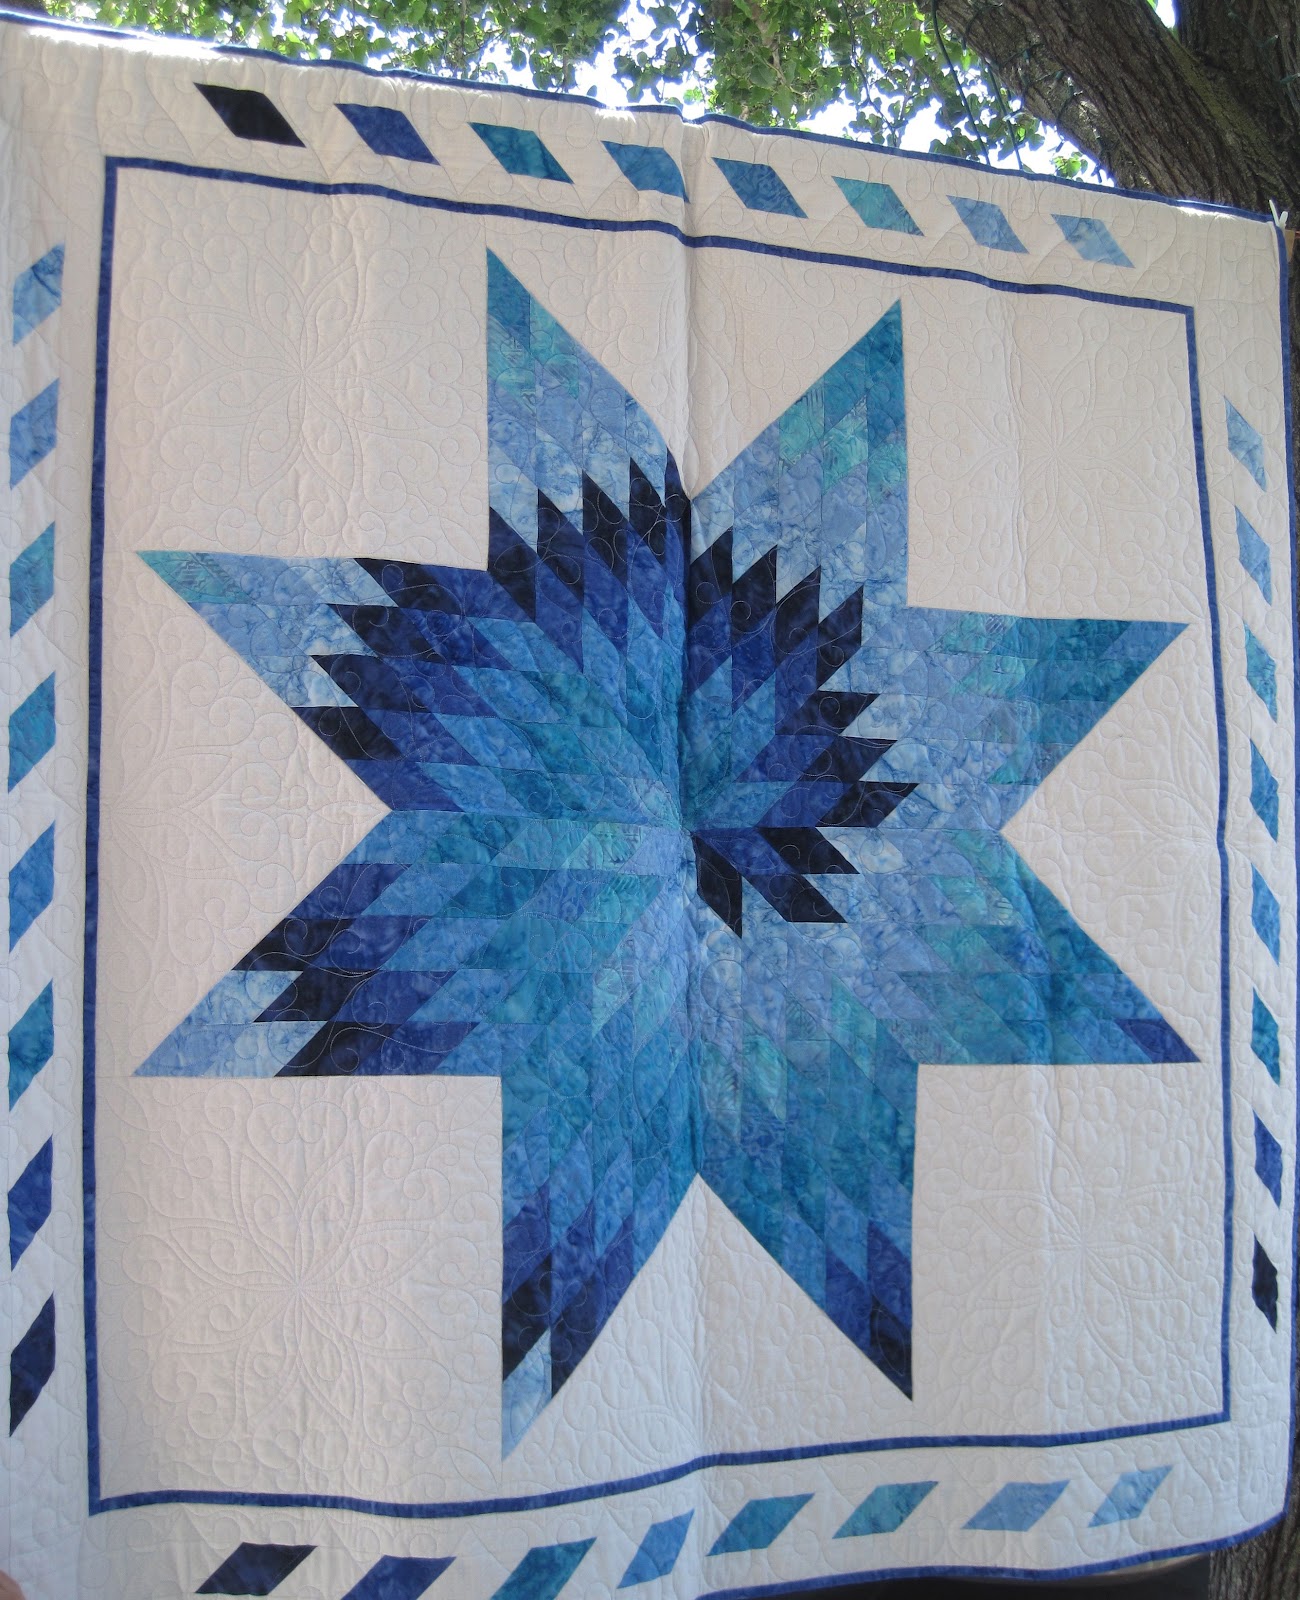
I currently have a number of scrap quilts in progress, but have been focusing lately on one that makes use of a traditional star block. Several women from my Mom's quilting group at the Martinez Senior Center have also been making star block quilts recently, so my Mom and I thought we'd try one too. I decided to see if I could make my star block quilt entirely from our scraps on hand -- Such fabric recycling is, after all, the traditional heritage of quilting. I selected light and dark scrap fabrics that I thought would coordinate together for a traditional/americana look.

I hadn't yet worked with small half-square triangles, so we figured this star quilt project would be a good learning experience. And indeed, maintaining cutting & piecing accuracy was a bit of a challenge.

Hmm ... cutting and/or piecing accuracy not so good ...
Part of the challenge came from working with a large variety of fabrics of disparate levels of quality, which is inevitable when using scraps. As a result, many of my star blocks ended up a wee bit wonky, probably due at least in part to different fabrics shifting in different ways.

However, when I assembled all of the blocks into the quilt top, I was happy to discover that I could successfully shmooze my less-than-accurate blocks together, matching seams pretty well. I lost some points here and there, and there are a few tiny tucks in a couple of the seams, but I don't think these "booboos" are too noticeable. I think the very scrappy nature of this quilt pattern makes it quite forgiving, lending itself quite well to a half-square-triangle newbie such as myself. So, this quilt is not a juried-quilt-show masterpiece -- but I think it'll make for a functional but pretty quilt, like in the traditional heritage of quilting. Overall, I'm rather thrilled with the treasure that has arisen from "the trash"!:

Star quilt top -- first stage of completion.
Close-up of star quilt top.
I'm now in the process of debating border choices. I'm thinking about trying some flying geese, which would be another first for me. Or, maybe some prairie points? I'm perusing some options using The Border Workbook by Janet Kime. Alas, I've still got plenty more scrap fabric to work with!

My Mom's star quilt is also beginning to take shape -- she's using her stash collection of 30s fabrics, and it is going to be a very bright and cheery quilt. Of course it has been fascinating to see how different fabric choices, for the same exact quilt pattern, create a totally different look! Stay tuned for a comparison.

Wednesday, May 16, 2012

Black Opals & Ribbon Candy - Part II

We did it!: We got the tops done from Christine Barnes's Black Opals & Ribbon Candy class that we took last week at ThimbleCreek. And look, we used some blue fabrics; we've been reformed! ;)

Mom's
Mine
My Dad says these wall-hangings are "eye poppers"... I'm not sure if that's a good thing, but I really like them. The center "opals" glow warmly, surrounded by the cooler colors -- which was the goal of this exercise in color usage. My Mom decided to go with a thin frame from the stripe fabric cut on the bias that I think adds a wonderful bit of whimsy that's very suggestive of ribbon candy. I decided to go more sedate, and let the opals stand out on their own.

Now for the sandwiching and quilting ... my least favorite part of the quilt-making process. But, these will provide us with a good opportunity for some free motion practice.


Wednesday, May 9, 2012

Black Opals & Ribbon Candy

This past weekend, my Mom and I were privileged to take Christine Barnes' Black Opals & Ribbon Candy class at one of our local quilt shops, Thimblecreek Quilt Shop. It was a belated Christmas present to my Mom, and we'd been looking for some time for a local quilt class that we might like. We'd been holding out for a class that was about learning a new technique or skill -- as opposed to a class that would just be about constructing a particular quilt pattern (we've already got plenty of those kinds of UFOs!). Mom was skeptical when I suggested Christine's class because ... well ... we are prejudiced against blue (our least favorite color), and Christine's sample quilt in the class advertisement is, well, very blue-ish:
Quilt by Christine Barnes, "Black Opals & Ribbon Candy",
on display at Thimblecreek Quilt Shop for our class.
However, I must have been really drawn to this quilt because I had taken a picture of it weeks before when it was on display (amongst hundreds of other quilts) at the Foothill Quilters Guild show in Auburn, CA. Christine is an expert in the use of color, with a new book out called Quilter's Color Club. So, we decided to delve into some color theory education!

In the days leading up to the class, we had a lot of fun combing through our stash for fabrics to take. Christine's quilt pattern calls for a striped fabric (that's used as part of the sashing), so we chose a few of those, plus a bounty of fabrics that we thought would coordinate well. We joked that we'd have to rent a U-haul truck if we wanted to bring all of the stash with us to the class! We also popped into our local quilt shop (when we were supposed to be out running errands, LOL!), A Quilted Heart, and a new Robert Kaufman fabric called Fiori that features stripes immediately jumped out at me.

At the class, it was fabric, fabric everywhere -- what fun!! Everyone else had also brought plentiful fabric choices ... and of course there were immediate shopping opportunities for even more fabric in Thimblecreek! Christine helped each person with the fabric selections for their quilt, with lots of excellent information about color value and contrast.


Many of the fabric combinations that Christine suggested were ones I never would have considered, but the results were fantastic! She ended up steering both me and my Mom toward fabrics that we had only brought as "runner up/second-choice" options, and we are now LOVING these suggested color combinations. It was really wonderful to see how each person's color and fabric choices came together in unique and unexpected ways. In short, we learned a lot. My Mom purchased Christine's Color Wheel, which we plan to now always have handy in the quilt room at home.

Mom's Black Opal quilt beginning to come together in class, on the design wall.
Holly's Black Opal quilt beginning to come together in class, on the design wall. 
Another student's Black Opal quilt beginning to come together in class, on the design wall.
Since the class, we've been continuing to work on our Black Opal quilts at home ... stay tuned for an update!